When my husband and I bought our house, the one thing that bothered me the most was our ugly linoleum floors in the second bathroom and in the hallway from the garage. The color was horrible, the pattern was horrible, it was just plain HORRIBLE! We lived with it for 6 years. Yes, that is right… 6 long years. Here is how we learned to paint linoleum floors.
Why we chose to paint our floors
I thought the only option was to tear it up and tile, but then I saw that there were a lot of crazy people out there painting their linoleum floors. When I saw there inexpensive transformations, I was all in and willing to give it a try so call me crazy!
Here is my experience and tips for How to Paint Linoleum Floors. To watch my entire journey head to to my Instagram page and check out my saved Highlight on DIY Painted Floors.
Make sure to check out our most recent home project- Laundry Room Makeover for Under $200
Some of the links below are affiliate links, meaning at no additional cost to you, I will earn a commission if you click through and make a purchase.
Let’s Look at the BEFORE

Prep the Floor First
First Step
Clean your floors. I was painting bathroom floors, so I wanted to make sure my surface was clean of hair and oil and anything else. I used a really strong cleaner for a deep clean.
Next step
was to sand the surface. Linoleum has a glossy finish to the top and Linoleum isn’t the most ideal material to paint so you want to make sure to roughen up the top layer so the paint will stick well. This is where I messed up the first time. I lightly sanded and then ended up needing to go back and re-sand. Make sure to use a 180/120 grit sandpaper and really focus on this step. Get every corner! To make this step less miserable, I highly recommend you use an electric sander. I can’t imagine doing this step without one.
Last Step
I HIGHLY suggest using a DE glosser. I think this was my lifesaver! When I sanded the first time, I had a lot of trouble getting paint to stick. Once I used the DE glosser it was a game changer. DON’T SKIP THIS STEP! You just pour the DE glosser on the floor and rub it on with a rag and that’s it.
Time to Paint
After you tape the edges, it is now time to paint! I used a Porch and Patio Paint so it could handle the wear and tare of foot traffic and water in the bathroom. I know there are kits out there that claim they can be used on linoleum floors, but I have trouble trusting any product that says “no sanding needed” and I didn’t want to be limited to what colors I could use. If you use a Porch and Patio Paint you can use any color you want!
I did 3 coats of the base color and then let it sit overnight. The next day was stencil day. I got this amazing stencil pattern HERE. Make sure to measure the stencil on the floor and then get to work! I highly recommend spraying the back of your stencil with acrylic spray to keep the paint from bleeding underneath.
Tip: I found it WAY easier to use a stencil brush then a roller. The roller was collecting too much paint and causing a lot of bleeding on the edges. The stencil brush, even though it was more tedious it gave me a lot more control over how much paint I was using and gave me much crisper lines. I would use the brush in an up and down motion (kind of like tapping the paint on). I did all of the stenciling in 1 full day.

Touch Up Paint
The next step was to go back and clean up the lines with a small paint brush. This is another step you can’t skip. It made a big difference after I went around cleaning up the lines.
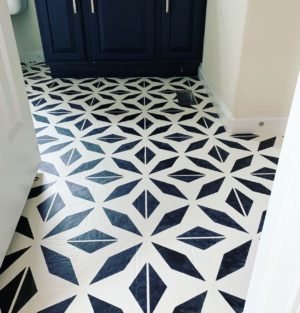
The final step is to roll on a layer of Polyurethane to protect the floor. And TA-DA, all done!


I am so happy with the way it turned out. The modern look and the bold black and white stenciled floors was exactly the vibe I was going for. Its very easy steps, you just have to have some patience. I think for under $100, it is TOTALLY worth the work!
Here are some of the items and tools that help make this a successful project.


Stencil Brushes | Acrylic Spray | Orbital Sander | Dense Finish Foam Roller
If you feel like this project isn’t for you and you want to know how to rip up linoleum flooring and lay tile, check out my blog post on How to Tile Like a Pro.
LOVE this DIY Home Project? Check out these other posts that I know you will enjoy! Kids Outdoor Playhouse Makeover | DIY Mudroom Entry Wall | Easy Ways to Update a Builder Grade Bathroom | Best Way to Organize Barbie Dolls
For more inspiration, ideas and a sneak peek into our daily life sign up to receive WHIM sent straight to your E-mail. My bi-weekly newsletter is full of DIY Home Projects, Home Inspiration, Recipes and a round up of what has been going on. Click HERE to join the Project Whim Club!