As a mom of 3, finding engaging and creative activities to enjoy together is always a wonderful opportunity. We had 2 brand new (GIANT) garden beds that we had planted in, and I needed a way to get from one side to the other with my bare feet (yes, that is how I roll). I came up with the idea to make our own garden stepping stones. I thought this would not only be an inexpensive project, but also a fun and memorable way to create lasting memories in our outdoor space. If you’re looking to enhance your garden and spend quality time with your little ones, why not try making DIY stepping stones? In this blog post, I’ll guide you through the process of creating beautiful stepping stones using quick concrete and seashells or stones, allowing you and your kids to unleash your artistic talents and leave a personalized mark in your garden.
Make sure to scroll to the bottom for a list of some of my favorite garden must-have items!
If you like watching video tutorials, head to my Instagram page and watch the steps in my reel! TAG ME on Instagram @projectwhim if you try anything from the blog! I love to see and share!
Some of the links below are affiliate links, meaning at no additional cost to you, I will earn a commission if you click through and make a purchase.


Materials Needed for DIY Stepping Stones:
– Quick concrete mix
– Water
– Mixing container like a 5 gallon bucket
– Seashells (collected from your beach trips or purchased)
– Natural Decorative stones, colorful glass crystals, or mosaic tiles (optional)
– Plastic Plant Saucer (You can get multiple uses out of these!)
– Mixing spoon or trowel
– Rubber gloves

How to Make DIY Stepping Stones for your Garden
Step 1: Prepare the Work Area
Before you begin, designate a suitable work area in your garden, garage or backyard. Lay down a protective sheet or newspaper to catch any spills or messes.
Step 2: Mix the Quick Concrete
Follow the instructions on the concrete package to mix. Typically, you’ll combine sand with water in a mixing container like a bucket until you achieve a thick, pourable consistency.

Step 3: Prepare the Mold
Coat the inside of your plastic mold or plant saucer with a release agent or cooking spray. This will prevent the concrete from sticking to the mold.
Step 4: Pour the Concrete
Carefully pour the mixed quick concrete into the mold, filling it to your desired thickness. Ensure that the surface is level and smooth. Give your mold a little shake to get all the air bubbles out.

Step 5: Add Seashells and Decorations to you DIY Stepping Stones
No the fun part! Press seashells, rocks or stones onto the surface of the wet concrete, arranging them in creative patterns or designs. Sometimes it is helpful to lay out your design before you start adding it to your stepping stone. We wanted a very “earthy” look so we used rocks and made shapes like a bumble bee, butterfly, flowers, etc.


Step 6: Personalize and Decorate
Encourage your kids to get creative by adding their handprints, names, or special designs using their fingertips or small tools. We love this personal touch. It will make the stepping stones truly unique and special. We made sure to do a stepping stone with each of our family members hands.


Step 7: Allow for Drying Time
Allow the stepping stones to dry and cure according to the instructions provided with the concrete package. This usually takes around 48 hours. Make sure the stones are kept in a safe, undisturbed area during this time.
Step 8: Remove from the Mold
Once fully cured, gently remove the stepping stone from the mold. If using a plastic mold, flex the sides to loosen the concrete, and carefully lift it out. I was surprised at how easily ours came out. Make sure to save your molds incase you want to make more!


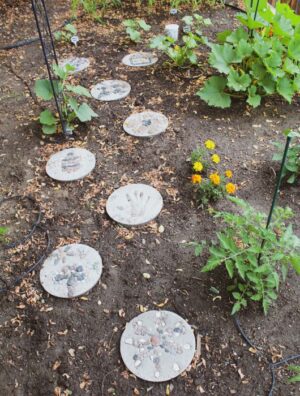
Step 9: Placement in the Garden
Choose the perfect spot in your garden to display your DIY stepping stones. Arrange them along a garden path or near flower beds, adding a touch of whimsy and character to your outdoor space. We added ours through out our garden!


By combining the versatility of concrete and the beauty of seashells, you and your kids can create stunning DIY stepping stones that will transform your garden into a personal oasis. This enjoyable project not only fosters creativity and bonding but also allows your children to leave their artistic mark for everyone to admire. We love walking through our garden and looking at all our creations. So, gather your supplies, put on your creative hats, and embark on this exciting journey of making lasting memories through the art of DIY stepping stones.
Check out some of my favorite Garden Must Haves.
Solar Garden Lights that Look Like Fire Flies | Storage Box for Saving Seeds | Tumbling Compost Bin | Potato Growing Bags | Rapid Soil Testing Kit | Garden Trellis


Love this DIY Stepping Stone craft tutorial idea?
Make sure to check out my blog post on DIY Bandana Tote Bags Craft | 10 HACKS for your Family Road Trip | National Park Birthday Party | 7 Creative Ways to Gift Experiences for Kids | Laundry Room Makeover for Under $200 | Our First Year of Homeschool | The Ultimate Barbie Doll Storage Solution
Don’t forget to follow me on Instagram for more tips, DIY projects and fun activities for kids.


5 responses to “DIY Stepping Stones: Transform Your Garden with this Easy Craft”
Thanks for a marvelous posting! I seriously enjoyed reading it, you happen to be a great author.I will be sure to bookmark your blog and will often come back in the foreseeable future. I want to encourage you to definitely continue your great job, have a nice morning!
This is the right weblog for anyone who needs to search out out about this topic. You realize so much its almost onerous to argue with you (not that I truly would want匟aHa). You positively put a brand new spin on a topic thats been written about for years. Great stuff, just great!
My brother suggested I might like this website. He was entirely right. This post truly made my day. You can not imagine simply how much time I had spent for this info! Thanks!
I like what you guys are usually up too. Such clever work and reporting! Keep up the wonderful works guys I’ve incorporated you guys to my personal blogroll.
Valuable information. Fortunate me I found your website accidentally, and I am surprised why this coincidence didn’t happened earlier! I bookmarked it.