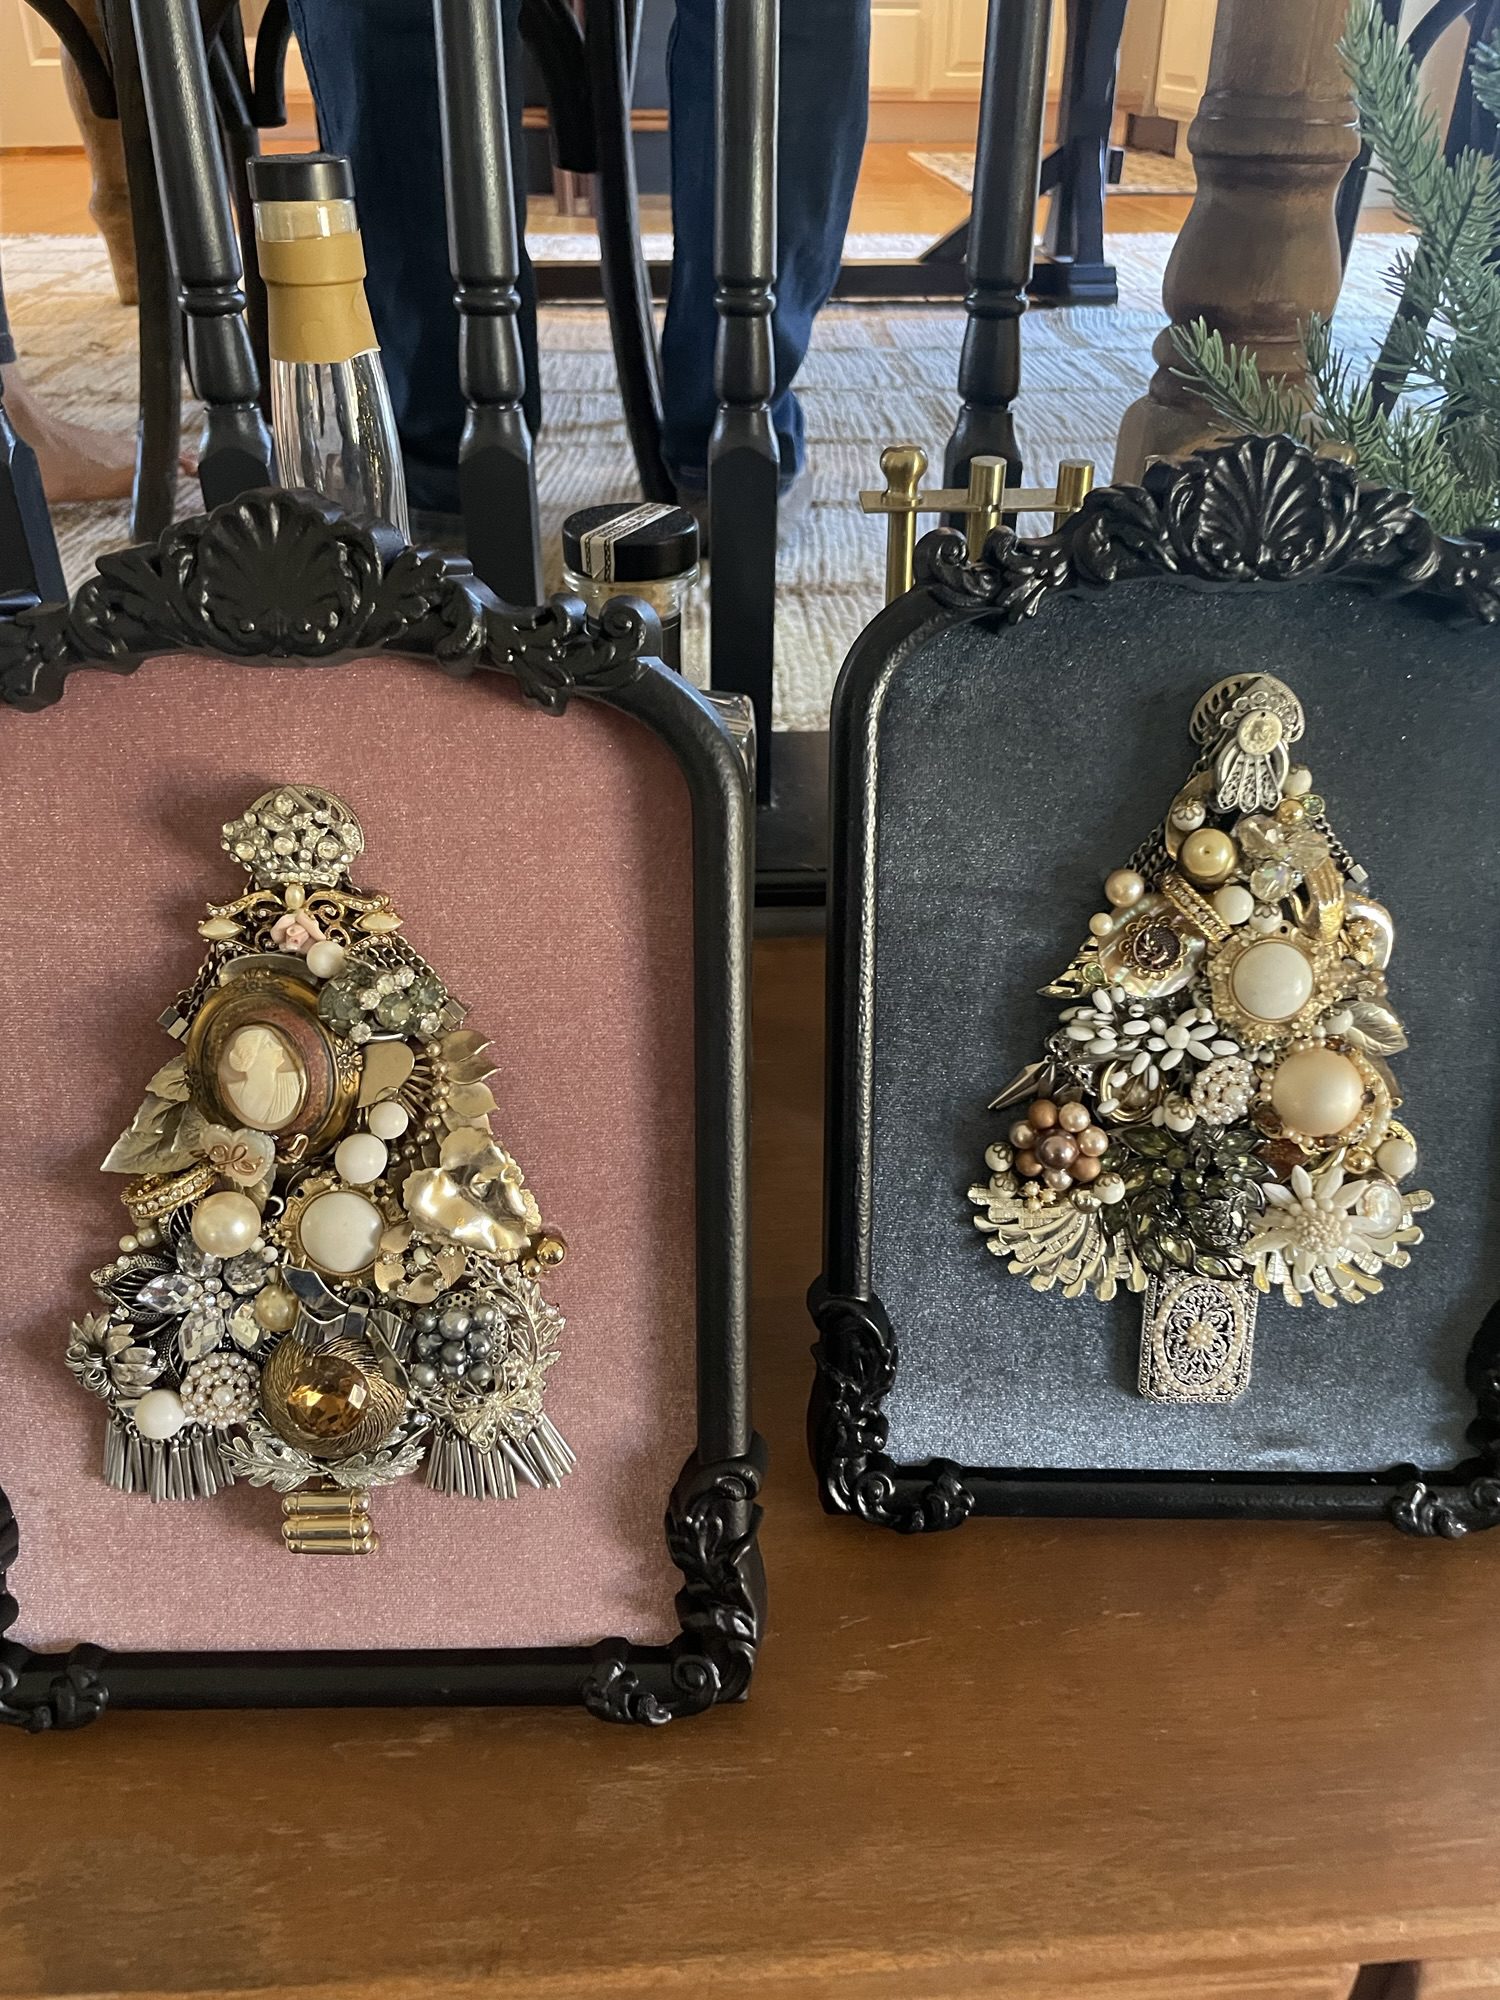
There’s something special about decorating for Christmas with pieces that have a little history. Maybe it’s a brooch tucked away in your grandmother’s jewelry box, a pair of earrings you found at the thrift store, or a handful of forgotten costume jewelry that’s too pretty to throw away. Instead of letting those pieces sit in a drawer, why not turn them into something beautiful?
This vintage jewelry Christmas tree is a simple, sparkly DIY that transforms old brooches, earrings, beads, and other jewelry into a piece of holiday art. Arranged in the shape of a Christmas tree and displayed in a pretty frame, the finished piece feels timeless, collected, and just a little bit glamorous.
It’s also a wonderful way to upcycle thrifted finds or give new life to sentimental pieces you no longer wear. Whether you make one for your own home or create it as a handmade Christmas gift, this project brings a little vintage charm to the holiday season.

Why You’ll Love This Vintage Christmas DIY
- It gives old jewelry a new purpose. Turn forgotten accessories into something you’ll look forward to displaying every Christmas.
- It’s easy to customize. Use colorful costume jewelry, elegant rhinestones, pearls, or a mix of vintage pieces.
- It’s a thoughtful handmade gift. Incorporate meaningful jewelry to create a keepsake for someone special.
- It looks beautiful on display. A dark velvet background makes the jewelry sparkle and gives the finished artwork a classic, heirloom-inspired look.
- It’s perfect for thrifting. You don’t need expensive jewelry to make something beautiful. Costume jewelry and secondhand finds work wonderfully.

Supplies You’ll Need
You only need a few supplies to make your own vintage jewelry Christmas tree.
- One picture frame, thrifted or repurposed
- Velvet fabric or another dark fabric for the backing
- Assorted vintage or costume jewelry, including brooches, earrings, beads, and decorative pieces
- Hot glue gun and glue sticks
- Tweezers for positioning small pieces
- Optional: battery-operated fairy lights for a little extra sparkle
A note about jewelry: Look for pieces in different sizes, shapes, and finishes. Rhinestones, pearls, gold-tone brooches, and sparkling clip-on earrings all work beautifully together. Thrift stores, estate sales, and your own jewelry box are great places to start.
How to Make a Vintage Jewelry Christmas Tree
Step 1: Prepare Your Frame
Choose a frame that complements your style. An ornate gold frame gives the finished piece a traditional vintage look, while a simple frame lets the jewelry take center stage.
Remove the glass and prepare the backing. Cut your velvet or dark fabric to fit the frame, then secure it smoothly in place. Black, deep green, navy, and burgundy are all lovely choices, especially if you want the jewelry to stand out.
Make sure your backing is secure and suitable for the weight of the jewelry you plan to use.
Step 2: Gather and Sort Your Jewelry
Lay out all your jewelry pieces so you can see what you’re working with.
Separate larger statement pieces from smaller earrings, beads, and decorative accents. Look for interesting shapes and textures, and don’t worry if everything doesn’t match perfectly. Part of the charm is creating a collected look with pieces that feel as though they’ve been gathered over time.
If you’re using sentimental heirloom jewelry, take a moment to plan where each piece will go before attaching anything.
Step 3: Arrange Your Christmas Tree Shape
This is the fun part!
Start arranging your jewelry on the fabric in the shape of a Christmas tree. Begin with your larger, bulkier pieces toward the bottom, then work upward with smaller pieces to create a natural triangular silhouette.
Use brooches and larger statement pieces as anchors, filling the spaces between them with earrings, beads, and smaller accents. Turn pieces in different directions to help them fit together, and experiment with the arrangement until the tree looks balanced.
Leave a little breathing room around the edges so the shape is easy to recognize. You can also add a small piece at the top to resemble a star or use a few gold-tone pieces at the bottom to suggest a tree trunk.
Tip: Take a photo of your arrangement before gluing anything down. It’s an easy way to remember where each piece belongs.

Step 4: Attach the Jewelry
Once you’re happy with your design, carefully attach each piece using hot glue.
Work with one piece at a time, lifting it from the arrangement, applying a small amount of glue to the back, and pressing it firmly into place. Tweezers can help position smaller pieces without disturbing the surrounding jewelry.
Be mindful of delicate or valuable pieces. Hot glue can damage some finishes and may be difficult to remove, so avoid using it on anything precious or irreplaceable. For heirloom jewelry you’d like to preserve, consider a reversible mounting method instead.
Continue until the entire tree is securely attached.

Step 5: Add the Finishing Touches
Step back and look at your tree from a distance. Fill any noticeably empty spaces with smaller beads or earrings, and make sure the overall shape feels balanced.
If you’d like a little extra holiday sparkle, you can add delicate battery-operated fairy lights around the frame or background, keeping the lights and wiring away from any heat-sensitive materials.
Once everything is secure, place the finished artwork in your chosen frame and admire your work!
Tips for a Beautiful Vintage Look
A few simple choices can make your finished Christmas tree look especially elegant.
Stick to a loose color palette. Gold, silver, pearls, clear rhinestones, and soft jewel tones create a cohesive look without requiring every piece to match.
Use a dark background. Velvet in black, forest green, navy, or burgundy helps reflective stones and metallic finishes stand out.
Mix sizes and textures. Large brooches provide structure, while smaller earrings and beads fill gaps and add detail.
Let the jewelry be the star. You don’t need to fill every inch of the frame. A little negative space can make the design feel more intentional.
Choose a frame with character. A vintage gold frame or an ornate thrift-store find can make the entire project feel like a treasured antique.

Make It a Meaningful Christmas Gift
One of my favorite things about handmade gifts is the opportunity to create something that feels personal. This project is especially lovely when you use jewelry that belonged to a loved one or pieces collected over the years.
You could make one using a grandmother’s costume jewelry, a mother’s favorite brooches, or a collection of thrifted pieces chosen specifically for the recipient. Even when the jewelry isn’t particularly valuable, the finished artwork can feel like a little collection of memories.
It’s a thoughtful gift for someone who loves vintage décor, sentimental keepsakes, or a home filled with collected pieces that tell a story.
Where to Display Your Jewelry Christmas Tree
Once the holiday season arrives, display your framed jewelry tree on a mantel, bookshelf, entryway table, or gallery wall. It also makes a beautiful addition to a Christmas vignette alongside brass candlesticks, vintage ornaments, and other collected holiday decorations.
Because the piece is framed, it’s easy to store safely and bring out year after year.
A Little Vintage Sparkle for Christmas
You don’t need expensive supplies or a complicated craft to create something special for the holidays. With a simple frame, a piece of fabric, and a collection of old jewelry, you can make a unique Christmas decoration that feels both nostalgic and timeless.
Whether you use thrifted costume jewelry or pieces that have been passed down through your family, this vintage jewelry Christmas tree is a beautiful reminder that sometimes the most meaningful decorations are the ones we make ourselves.
Happy creating!
“upcycled Christmas craft,” “vintage jewelry art,” “DIY holiday décor,” “simple homestead DIY gifts.”